
I do have a few pictures of things I made from Friday, but I thought I would show how I did the stencils for our drawers instead. Then maybe I’ll have time to get a picture of the rest of the stuff I made!
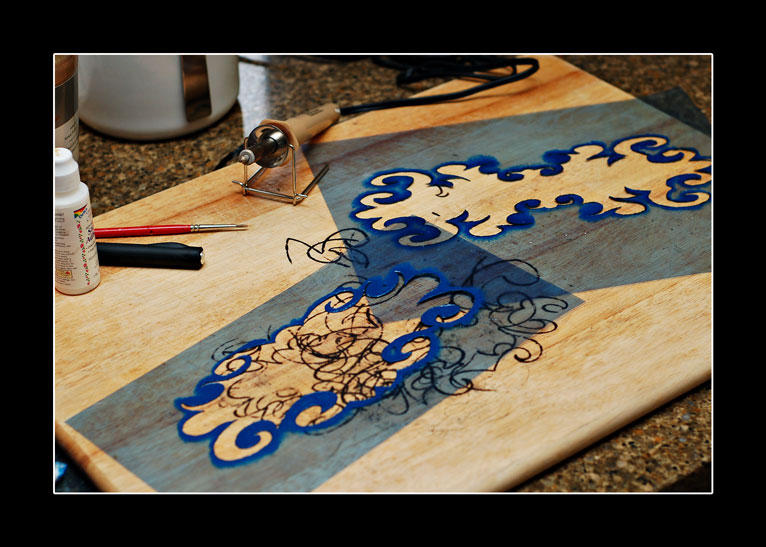
First, you need a design you like. I used some of my drawings and skewed them to fit in the dimensions I needed. I printed them on 8.5 x 11 inch stencil paper, so that was the maximum width. This is the design I used below the sink.

I had to take a few things off the design that were too intricate and futsy (made up word) to cut out. Also, the inside is going to be cut out, so don’t plan on having anything fancy on the interior.
Next, I got some stencil paper (at Michael’s craft store) and cut it to 8.5 x 11, so it would fit in my laser printer. Ink jet printers don’t work for these, so I used my printer at work. It wouldn’t have really mattered, though, since our printer at home has been out of ink for months. 😉
Now you need to cut the design out of the middle. I used a wood burner and burned/melted the plastic, but I also used an exacto knife. The burner worked alright, but the edge was a bit rough. I need a point instead of the rounded edge I have for my burner. If you do use a burner, you need to make sure you have a decent surface to use it on…like an old wood cutting board. Don’t use your heavy plastic cutting mat…just an FYI.
After it is cut, you need to put some stencil glue on it. Don’t overuse it, since it might leave excess glue on the cabinet after you take it off. Another FYI. The glue needs to dry a bit and get tacky, so leave it for about 15 minutes. When the glue it ready, center the stencil on the cabinet and rub it on. Make sure the edges seem to be attached to the cabinet well.
Now for the painting, you will need the paint and a stencil brush. I have used a foam brush and also a bristled brush. You need to pounce the paint inside the stencil. Don’t load it up and pounce near an edge, though, since it could bleed under the stencil if there is excess paint. Just go around it and fill in the area. It may be necessary to do this several times with a darker paint (I had to do three coats). When it is dry, take off the stencil.

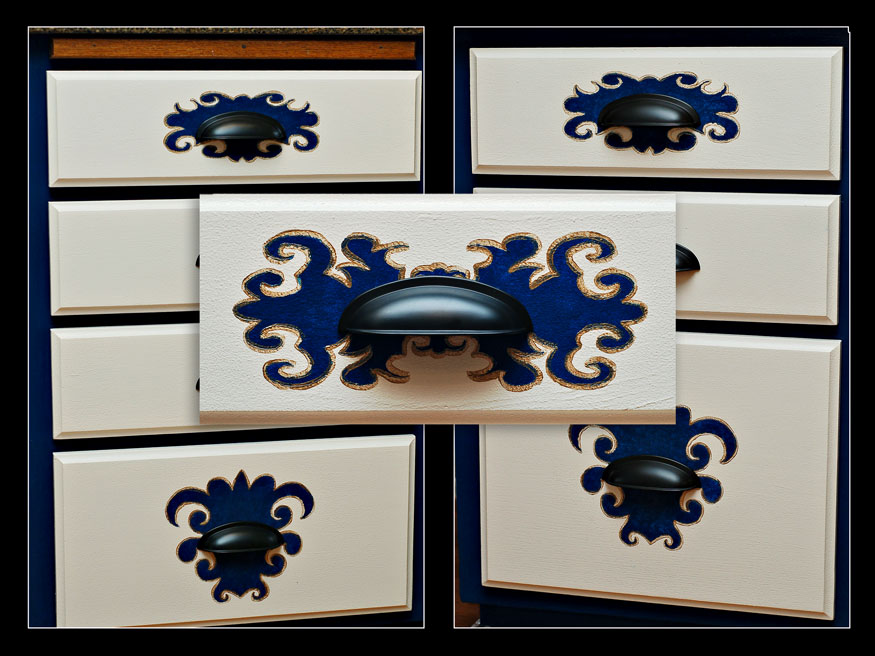
The edges were a bit rough on mine, so I outlined it with a gold paint. All done and pretty!


I love that detail. You did such a great job on it. And really creative, I don’t know that I would have thought of it.
Very beautiful, and very clever! Is there no end to your creativity? But my favorite part is that your home printer has been out of ink for so long – yay, I’m not the only one!
Thanks for the tutorial. I always love all of your stencils.
I don’t know….you make it look so easy!
~Dawn 🙂
You are so crafty with the paint…I may have to try this one of these days!
you rock…as usual!
That is so beautiful!!
Wonderful. I like the gold paint. Clever! I did a bit of stencilling way back when. Couldn’t do it now though, Mr Himself Designer wouldn’t approve. He’s all about minimalism.
I love the look of these. Nice work!
Stacy, those drawers are absolutely awesome. It is a beautiful dresser. And I would have never known that you added the gold because your edges werent perfect. The gold adds so much to the design.